Creating a diecast car isn’t just a hobby—it’s an exploration of miniature engineering, design precision, and automotive passion. For collectors and creatives alike, the opportunity to build your own model opens the door to customization, historical tribute, or simply the satisfaction of crafting something with your own hands. Whether you’re a seasoned hobbyist or a beginner, this step-by-step guide on how to create a diecast car will provide you with the essentials for building a realistic and high-quality replica.
Step 1: Research and Planning
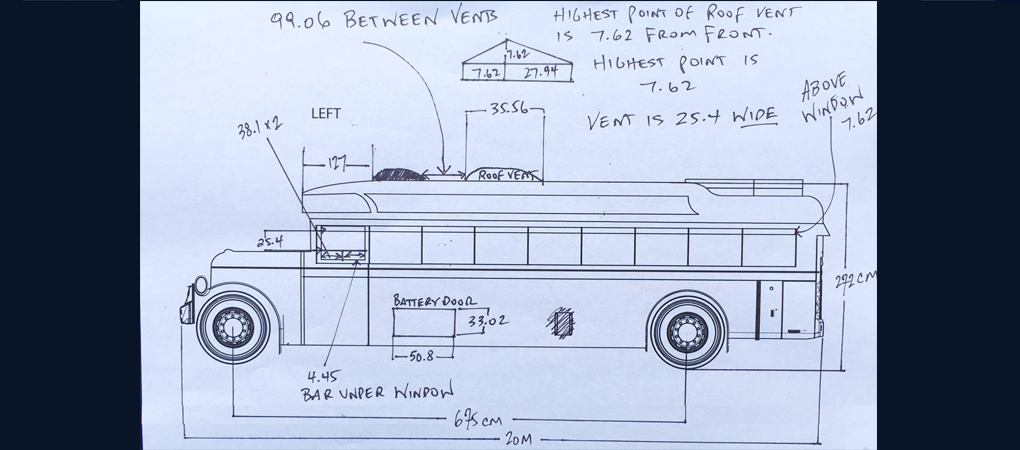
Every successful diecast project begins with thorough research and solid planning. Start by selecting the vehicle you want to replicate. Consider factors like historical relevance, design complexity, and personal interest. Once you’ve made your choice, gather reference materials such as:
- Blueprints and schematics
- High-resolution images from all angles
- Color codes and paint finishes
- Videos of the car in action (for realism in details)
Sketch your own design if you’re modifying the original model or creating a custom concept. Planning out how many parts your model will need, which components will be functional (like opening doors), and what materials you will use is essential.
Step 2: Choosing the Right Scale and Tools
Diecast models come in various scales. Here are the most common:
- 1:64 – Small and simple, good for beginners
- 1:43 – Popular in Europe, ideal for display
- 1:24 – Great balance between size and detail
- 1:18 – Highly detailed, suitable for advanced builders
Choose a scale that fits your skill level and available workspace. You will also need specific tools:
- Precision screwdrivers and pliers
- Files, sandpaper, and cutting tools
- Airbrush or fine spray cans
- Casting mold kit (for custom parts)
- CAD software (optional but useful for custom designs)
Step 3: Sourcing or Fabricating Parts
You have two options when creating your diecast car—sourcing parts from kits or fabricating them yourself. For those aiming to fully control the process, 3D modeling and printing is an excellent method to prototype parts before casting them in metal.
Metal components are typically made from a zinc alloy known as zamak. If you are casting parts yourself, ensure your mold is heat-resistant and capable of handling metal at high temperatures.
For interior elements like seats, dashboards, and trim, you may use resin or plastic depending on the level of detail you want to achieve.
Step 4: Molding and Casting
Diecast cars get their name from the die casting process, which involves pouring molten metal into a mold under high pressure. Here’s how it works:
- Create a master model for each part
- Make a silicone or steel mold based on the master
- Heat the zinc alloy to its melting point (around 400°C / 750°F)
- Pour or inject the molten metal into the mold
- Let it cool and solidify before removing it
After casting, each part will need to be cleaned and sanded to remove excess material and prepare it for painting or assembly.
Step 5: Painting and Surface Treatment
Once your components are cast and cleaned, it’s time to bring them to life with color. The painting process begins with a primer to ensure paint adhesion and surface smoothness.
Here’s a simplified paint process:
- Apply primer evenly
- Let it dry and wet-sand with fine grit
- Apply base coat with an airbrush or spray
- Add layers gradually and let each dry
- Apply a clear coat for gloss and protection
Use masking tape for two-tone designs or detailed graphics. For decals, soak them in water, slide them into place, and seal them with a decal setting solution.
Step 6: Assembling the Car
Now comes the rewarding part: putting all the components together to create a working model. Begin with the chassis and suspension, followed by the interior, and finally the body shell. Make sure each piece is aligned perfectly—poor assembly can ruin the overall finish.
Use precision screws or glue to fix parts depending on their function and stress tolerance. Moving parts like doors and hoods should be tested for smooth operation before final attachment.
Common parts to assemble:
- Wheels and axles
- Interior (seats, dash, gear shifter)
- Windows and lights
- Exterior (bumpers, side mirrors, grills)
Step 7: Adding Realism through Details
The final step in your build is detailing—the aspect that elevates your diecast car from a toy to a display-worthy replica.
You can enhance realism with:
- Photo-etched parts for grilles and vents
- Chrome or matte finishes on trim
- Real fabric seat belts and soft-touch dashboard textures
- Working lights using micro LEDs
- Real rubber tires with treads
Even adding scuff marks, oil leaks, or light weathering can give your model character and realism.
Optional: Motorization or Electronics
If you’re feeling ambitious, you can integrate small electronics into your diecast model. Features such as functional headlights, engine sounds, or remote control movement are possible, though complex.
Microcontrollers like Arduino Nano or mini servos can help automate elements such as:
- Working headlights and taillights
- Motorized doors
- Spinning wheels or moving suspension
Keep in mind this adds a layer of complexity requiring wiring, battery management, and some programming knowledge.
Displaying or Sharing Your Work
Once your diecast car is complete, you can choose to keep it in a private display case or share it with other collectors online. Photography plays a huge role in showcasing the quality of your work. Use natural light or softbox lighting to capture details, and consider creating a small diorama or display base for presentation.
Online communities, forums, and social media platforms like Instagram and YouTube are great places to share your custom build. You can also enter contests or feature your models in exhibitions and collector’s meets.
Conclusion: The Satisfaction of Precision Craftsmanship
Creating a diecast car from scratch is more than building a model—it’s about immersing yourself in the artistry of automotive design, learning technical skills, and taking pride in a physical manifestation of your passion. Each project refines your abilities, expands your creativity, and connects you to a global network of like-minded enthusiasts. Whether it’s your first build or your fiftieth, the journey to create a diecast car will always be one filled with discovery, detail, and delight.