Understanding the Role of Garage Door Sensors
Garage door sensors are an important part of your home security, and they stop the door from closing if something is in the path. Sensors protect pets, children, and belongings from accidental harm or accidents, and if the sensors fail, the garage door may stop working properly. The good news is that many sensor issues can be solved at home with basic tools, patience, and knowledge that are often enough to fix them. Learning step by step makes the process less stressful and safe for homeowners who often wonder how to start when sensors are not working. Fixing a garage door sensor needs a simple and careful approach, and this guide will help you solve sensor problems without unnecessary stress.
Why Sensors May Stop Working and Safety Comes First
Before fixing a garage door, it is important to know why the sensors might fail, since common issues include dirt, loose wires, misalignment, or blocked lenses. Sometimes moisture, dust, or poor wiring also cause serious problems that make the sensors fail to work. Smartest Garage Door Safety Experts recommend starting with safety first because turning off the power supply before touching any wires or tools prevents electric shock and keeps you safe during simple repairs. It is always important to wear gloves and keep tools ready, while children and pets should stay away while repairs are being done. Keeping the area safe makes the repair work smoother and easier, and now we can check the common reasons behind faulty sensor issues.
Step One: Clean the Sensor Lens Carefully
The first step in fixing a garage door sensor is careful cleaning because dust, dirt, or spider webs often block the small sensor lenses. When sensors cannot see clearly, they stop the door from working properly, which can make the door fail to close or open smoothly. Take a soft, clean cloth and gently wipe the lens surface without using strong chemicals since they might damage delicate sensor parts inside. If dirt is stuck hard, you can use mild soapy water for cleaning, then dry the sensor with a soft towel to avoid water damage. Be sure to check both sensors because they work together to control the garage door. A simple cleaning often solves many issues quickly, but if the door still fails, continue to the next steps.
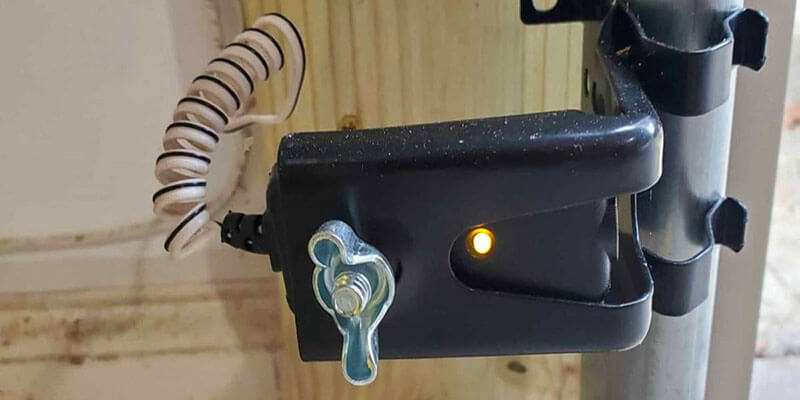
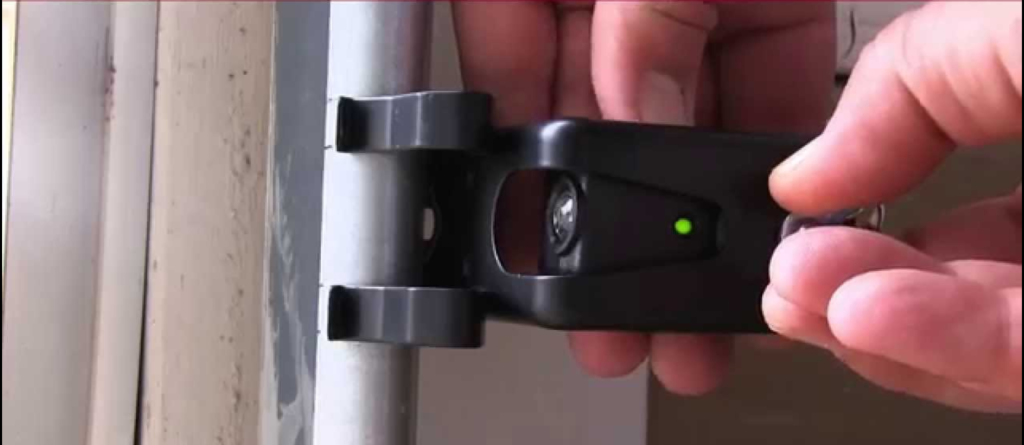
Step Two: Check the Sensor Alignment Properly
Another important part of fixing a garage door is alignment checking because garage door sensors need to face each other perfectly to work correctly. Even a small tilt can stop them from reading signals properly, so you must stand in front and see if both sensors look even straight. If one is higher or lower, you should adjust gently until both match, and a simple level tool can help ensure perfect balance between them. After alignment, check the small lights on both sensor units carefully since a steady green light shows the alignment is working as expected. If the light is blinking or off, you must adjust it again until the lights stay solid, and proper alignment usually fixes most problems with a garage door sensor.
Step Three: Inspect the Wiring and Electrical Connection
Sometimes fixing a garage door sensor requires checking the wiring system because loose, damaged, or frayed wires can interrupt the power to the sensors. Carefully look behind each sensor to see if wires are intact, and if you find loose wires, you should tighten them gently using a screwdriver tool. Do not pull the wires too hard because they are delicate inside, and if the wires look damaged, you should call an expert because replacement needs skill. Check also the power supply unit and confirm it is connected properly, then unplug and plug back the opener to reset the power connection. Many times, the issue comes only from a poor electrical contact, but once the wiring is secured, the garage door sensors usually work fine again.
Step Four: Remove Any Objects Blocking the Sensor Beam
Garage door sensors send invisible beams that must always stay clear because if something blocks the beam, the door will not close properly. Many homeowners forget to check this simple cause behind garage door issues, so it is important to look around the bottom of the garage door on both sides. Remove toys, tools, or boxes that might be near the sensors since even small objects can break the connection between the sensor beams. Sometimes sunlight or reflections can also confuse the small infrared beams, but you can block extra sunlight by placing small shades above the sensors. After clearing all obstructions, try closing the garage door again carefully, and if it works smoothly, then the problem was simply an object blocking the beam.
Step Five: Reset and Test the Garage Door Opener
After cleaning, aligning, and checking wires, you should reset the opener because resetting helps the opener reconnect with the sensors after adjustments are made. Unplug the power cord for a minute, then plug it again to refresh the connection, and some openers may also have a reset button near the motor. Press it to restart the system and reconnect the safety sensors before testing. Once power is restored, try operating the garage door using the remote, and watch the sensors closely while noticing the small lights on them. If the lights stay solid green, it means sensors are working correctly, and you should open and close the garage door a few times for testing. Consistent working shows that your sensor repair is fully successful after completing these steps carefully.
When to Call a Professional Garage Door Expert
Sometimes fixing a garage door sensor at home is not enough, especially if cleaning, alignment, and resetting do not solve the existing issue. It might be a deeper electrical fault or circuit board problem, and in such a case, you should not continue without professional repair assistance. Call a licensed garage door technician to handle these complex issues because experts have the tools and experience to fix advanced electrical and mechanical problems. Smart repairs done early can prevent bigger costs in the near future, and garage door experts also test the overall safety of the entire system for you. Your home remains safe when professional repair is done on time, and knowing your limits saves time, money, and possible safety risks, too.
Final Thoughts on Fixing Garage Door Sensors
Fixing a garage door sensor is easier when you follow proper steps by starting with cleaning, then checking alignment and wiring connections carefully. You should also remove any objects blocking the beams and reset the opener again, because most small problems can be solved with patience and simple tools. If issues continue after these steps, it is safer to call professional repair experts because Smartest Garage Door Safety Experts always suggest acting early to prevent damage. Learning basic repair steps helps you maintain safety and avoid accidents, and you should never ignore a faulty garage sensor because safety is very important. Taking action quickly keeps your garage secure and working all year, and now you know how to fix your door sensors properly at home.